Update: BitTorrent Sync has gone through several iterations and is now Resilio Sync ( https://www.resilio.com/individuals/ ). Much of this information below is still accurate, but some is not. I may post a new entry about the new Resilio version, but I do recommend you check it out if you want to have an easy way to back up your iPhone photos to your own server.
For quite some time, my iPhone Camera backup strategy was “iCloud does that, right?” While true, I eventually installed DropBox and let it start eating away at my space just to have a better backup. As anybody who does knows, space quickly becomes a problem. I’d managed to finagle a few extra GB of storage over time, but it’s just not enough. I wanted to be able to keep a backup of my photos, delete them from my camera, and save space in my Dropbox, all while avoiding iTunes sync. And, if possible, I wanted more control over where the backups were stored. I wanted my own privately hosted Dropbox.
So I did some digging. There are a number of nice programs that do this sort of a thing, and I took a serious look at three of them. I don’t want to get into them too deeply, but here’s the overview:
- ownCloud (http://owncloud.org/) – a fantastic self-hosted suite of programs that pretty closely mimic Dropbox. It offers a lot of nice features, relatively easy installation, and apps for most devices. I will probably look into this again in the future, but for this particular project, it was too big a tool. And the app cost $0.99…
- aeroFs (https://aerofs.com/personal_usage) – yet another fantastic implementation, with one distinct difference. There is no “cloud” storage needed. This service syncs between your devices directly, so no middleman, and no server needed. You can obviously put a mirror on your home box, but it’s not requried, so this is a good option for those who don’t have an extra space heater (aka server box) under their desk.
- BitTorrent Sync (http://www.bittorrent.com/intl/en/sync) – this little guy is relatively new, and is my pick of the pack for this project. It also allows decentralized syncing (no server needed) across any number of folders with minimal setup, and the iPhone app support auto-uploading your photos.
The first step is to get the program on all of the systems you care about. In this case, that meant my linux box and my phone. I’m running an Ubuntu 12.04 LTS under my desk, so I downloaded the linux version. Note: there is no install for the linux version, and no GUI interface, which can cause some confusion if you aren’t prepared. You’ll need to place the binary yourself, and make a quick configuration file. All of this is covered in the documentation, but if you’re in a hurry, here are my recommendations:
- Put the binary wherever you choose. I shoved it into /usr/bin
- Issue the command: btsync –dump-sample-config > btsync_conf.conf
- Jump into that file and change a few strategic things:
- “storage_path” : “/home/yourid/.sync” — this can obvious go anywhere, but if you don’t specify, it’ll always use your current directory
- “pid_file” : “/var/run/btsync/btsync.pid” — same with this one. If you don’t specify, it’ll use the current directory
- Under “webui”, change “listen” : “0.0.0.0:888x” – it defaults to 8888, but I was already using that for something else
- Also change the “password”, otherwise anybody who knows you’re running it can get in there and change things.
- Copy btsync_conf.conf into /etc/ for easy access
- Create the directory /var/run/btsync/ and ensure you have write access
- Launch btsync via the command: btsync –config /etc/btsync_conf.conf . You’ll see the following output when you do:
$ btsync --config /etc/btsync-config.conf
BitTorrent Sync forked to background. pid = 13232
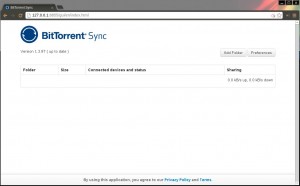
At this point, it will be up and running. The next step is to log into the Web UI via your browser and add a folder. The web address will be localhost:888x, depending on what you set previously. If you’re trying to access that site from another computer, don’t forget to set up your routing tables to allow the traffic if needed. Once you’re in, this is what you’ll see:
From here, you’ll need to get the App running on your phone. You can find it in the iTunes Store under BitTorrent Sync. Nice and easy.
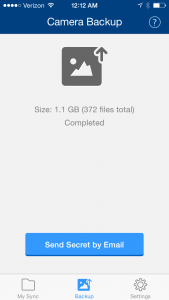
Go into the App and enable Camera Backup:
Once enabled, hit that “Send Secret by Email” button. This will generate an email with the large hash key that you’ll need to reference your files. Either email it to yourself, or be prepared to copy the whole thing down by hand. Either way works just as well.
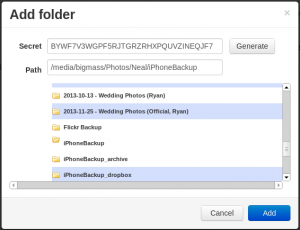
Go back to your browser and select “Add Folder”. Cut-and-paste (or type) the Secret key, and select the directory you want to use.
Once you hit add, you’ll immediately see things start to sync:
Let that run for awhile, and it’ll seamlessly sync all of your photos off of your iPhone and onto your Linux box. If you want multiple copies, you can also install BitTorrent Sync on other machines and connect them to the same “Secret”, and they’ll all work together to ensure everybody is in sync.
There’s only one small wrinkle left: if you delete a photo from your phone, BitTorrent Sync will delete it from the synced locations. If you enable the setting, it’ll store it in a folder called SyncArchive for a time, but eventually it will get deleted. To get around this, I created a second directory and set up a cron job to backup the backup once a day:
crontab -e
@daily cp -n /from/bittorent/backup/* /to/iPhoneCameraArchive/
You could do the same with rsync or pv or whatever copy command you prefer.
There you have it! It’s not the most elegant solution, but it’s lightweight and accomplishes the task at hand. If you find yourself playing with the BitTorrent Sync, let me know what you think.


